How to add global rules for firewall in a Windows profile
Click ‘Configuration Templates’ > ‘Profiles’ > click the name of a Windows profile > 'Add Profile Section' > 'Firewall'
-
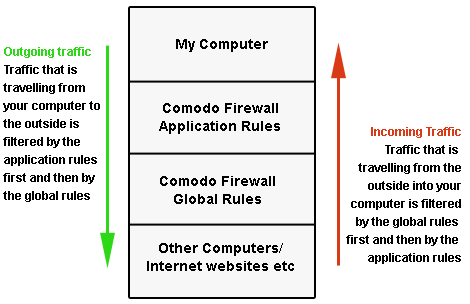
CCS firewall analyzes every packet of data in and out of an endpoint using combination of Application and Global Rules.
-
Application Rules - Determine the network access privileges of individual applications or specific types of applications at the endpoint.
-
Global Rules - Rules that apply to all traffic flowing in and out of the endpoint
-
For Outgoing connection attempts, the application rules are consulted first and then the global rules second.
-
For Incoming connection attempts, the global rules are consulted first and then the application rules second.
-
-
-
Therefore, outgoing traffic has to 'pass' both the application rule then any global rules before it is allowed out of your system. Similarly, incoming traffic has to 'pass' any global rules first then application specific rules that may apply to the packet.
-
Global Rules are mainly, but not exclusively, used to filter incoming traffic for protocols other than TCP or UDP.
-
This article explains how to add global rules to the firewall section of a profile.
-
See 'How to configure internet access rights for applications via Endpoint Manager' for help to create application rules.
-
See 'Firewall Rules Explained' at the end of How to create a custom firewall rule set in a Windows profile to read more about construction of a rule.
-
Configure global firewall rules
-
Login to Comodo One / Xcitium
-
Click 'Applications' > 'Endpoint Manager'
-
Click ‘Configuration Templates’ > ‘Profiles’
-
Open the Windows profile applied to your target devices
-
Open the 'Firewall' tab if it has already been added to the profile
OR -
Click 'Add Profile Section' > 'Firewall' if it hasn't yet been added
-
-
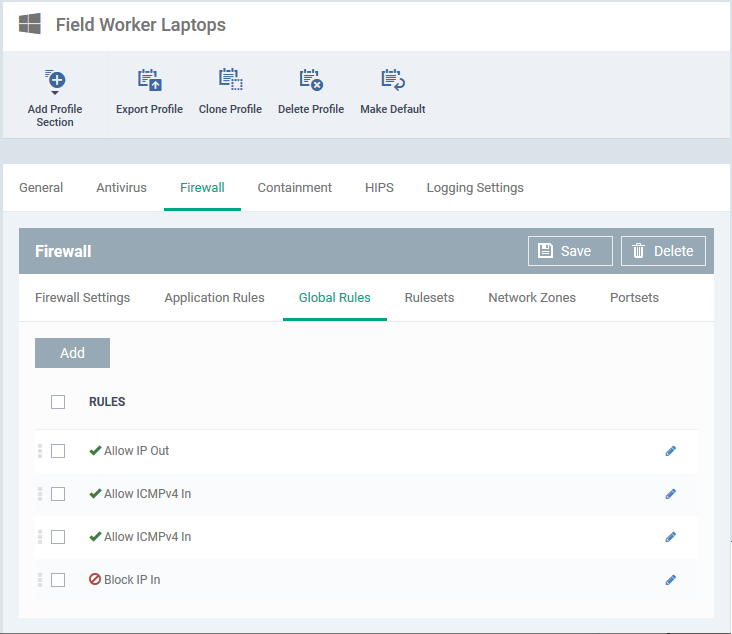
Open the 'Global Rules' tab
EM ships with a set pf predefined global rules.
-
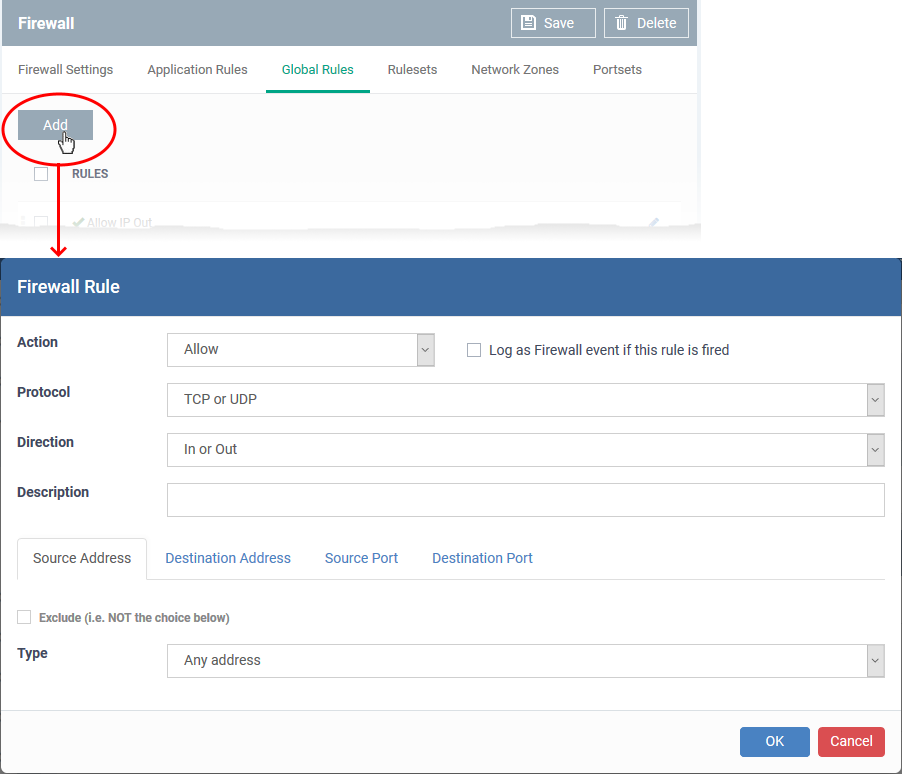
Click 'Add' to create a new rule
-
You configure firewall rules by defining the target traffic, and the action you want to take on that traffic.
-
Traffic conditions includes protocol, direction, source and destination address, and source/destination port.
-
If you are unsure about the settings in this area, we advise you first gain some background knowledge by reading 'Firewall Rules Explained' in the page How to create a custom firewall rule set in a Windows profile.
- Action: How the firewall should respond when the conditions of the rule are met. Options available are 'Allow' (Default), 'Block' or 'Ask'.
- Protocol: Specify which connection method the data packet should be using. The available options are 'TCP', 'UDP', 'TCP or UDP' (Default), 'ICMP' or 'IP' .
- Note: Your choice here alters the choices available to you in the tab structure on the lower half of the interface.
- Note: Your choice here alters the choices available to you in the tab structure on the lower half of the interface.
- Direction: Specify whether the traffic should be inbound, outbound, or both directions. The options are 'In', 'Out' or 'In/Out' (Default).
- Log as a firewall event if this rule is fired: Creates a firewall event log on the device whenever this rule is called into operation (i.e. when ALL conditions have been met). Default = Disabled
- Description: Type a friendly name for the rule. Name the rule by its intended purpose – e.g. 'Allow Outgoing HTTP requests'. If you create a friendly name, then this is shown instead of the full actions/conditions in the 'Global Rules' interface.
Protocol
i. 'TCP', 'UPD' or 'TCP or UDP'
If you select 'TCP', 'UPD' or 'TCP or UDP' as the protocol, then you also have to set the source and destinations:
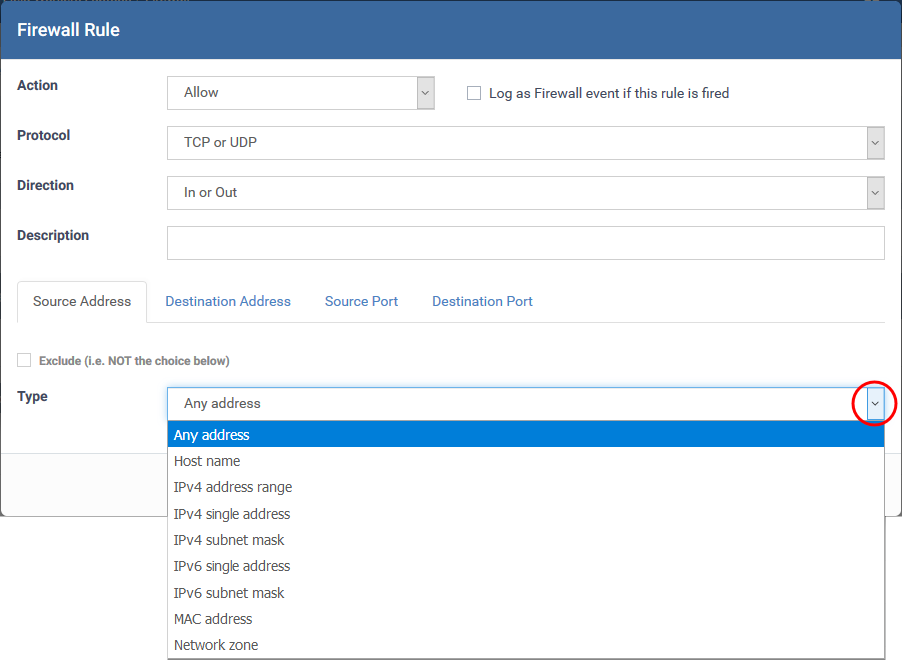
Source Address and Destination Address:
- Any - Defaults to an IP range of 0.0.0.0- 255.255.255.255 to allow connections from all IP addresses.
- Host Name - Enter the name in the 'Host Name' text field.
- IPv4 Address Range - Enter the first and last IP addresses in the 'Start IP' and 'End IP' text boxes.
- IPv4 Single Address - Choose a single IPv4 address
- Enter the IP address in the 'IP' text box, e.g., 192.168.200.113.
- Enter the IP address in the 'IP' text box, e.g., 192.168.200.113.
- IPv4 Subnet mask - Choose an IPv4 network. IP networks can be divided into smaller networks called sub-networks (or subnets).
- Enter the IP address and mask of the network.
- Enter the IP address and mask of the network.
- IPv6 Address Range - Choose all IPv6 addresses covered by a range - for example a segment in your private network
- Enter the first and last IPv6 addresses in the 'Start IP' and 'End IP' text boxes.
- Enter the first and last IPv6 addresses in the 'Start IP' and 'End IP' text boxes.
- Single IPv6 Address - Choose an IPv6 address
- Enter the IP address in the 'IP' text box, e.g., 3ffe:1900:4545:3:200:f8ff:fe21:67cf.
- Enter the IP address in the 'IP' text box, e.g., 3ffe:1900:4545:3:200:f8ff:fe21:67cf.
- IPv6 Subnet Mask - Choose a IPv6 network. IP networks can be divided into smaller networks called sub-networks (or subnets).
- Enter the IP address and 'Mask' of the network in the respective fields
- Enter the IP address and 'Mask' of the network in the respective fields
- MAC Address - Choose a single source/destination by specifying its physical address
- Enter the address in the 'MAC Address' text box.
- Enter the address in the 'MAC Address' text box.
- Network Zone - Choose an entire network. This menu defaults to Local Area Network. You can also define your own zones in the firewall section of a profile. See this wiki for help to create custom network zones
- Exclude (i.e. NOT the choice below) - Applies the action to all items except the one you specify. For example - create a block rule, specify an IP address, then select 'Exclude'. The rule will block traffic for every address except the one you specified.
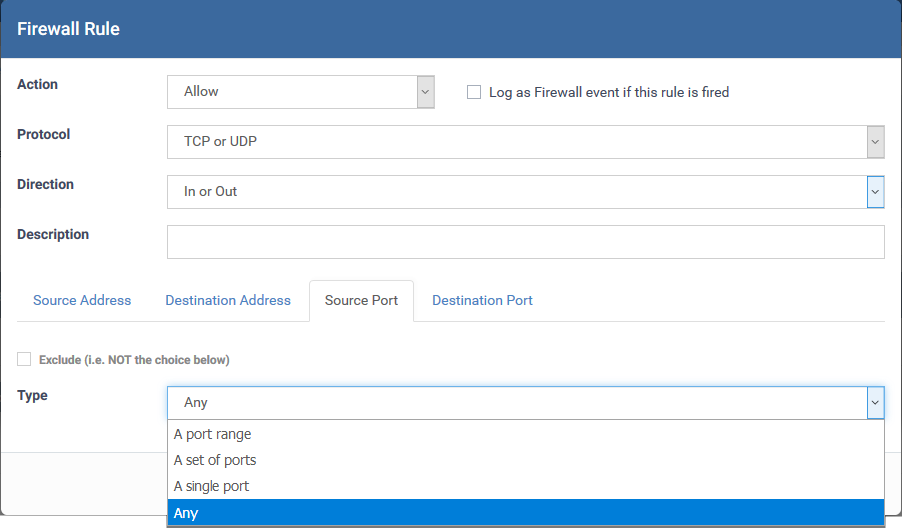
Source and Destination Ports
-
A port Range - Specify a set of ports covered by a range.
-
Enter the first port number and last port number in the respective fields
-
-
A set of ports - Choose a predefined Port Set. Predefined port sets are created and managed under the 'Port Sets' tab in the firewall section of a profile. See this wiki if you want mode details on creating and managing port sets.
-
A single port - Specify a one port number
-
Enter the single port number in the 'Port' drop-down combo-box .
-
-
Any - Apply the rule to any port number - set by default, 0- 65535.
ii. ICMP
ICMP (Internet Control Message Protocol) packets contain error and control information to announce network errors, congestion, timeouts, and to assist in troubleshooting. It is mainly used for traces and pings. Pinging is frequently used to perform a quick test before initiating communications.
If you select 'ICMP' as the protocol, then you also have to set the source and destination addresses and ICMP details. The source and destination addresses can be configured as explained above.
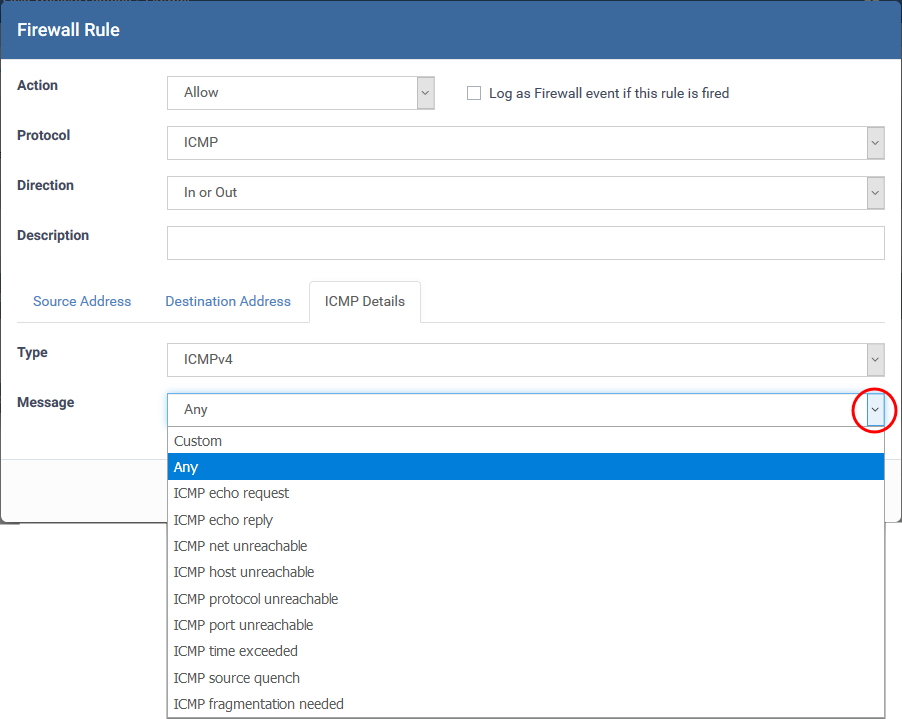
ICMP Details
- Type - Choose the ICMP version
- Message - Specify the type of the ICMP Message.
When you select a particular ICMP message , the menu defaults to set its code and type as well. If you select the ICMP message type 'Custom' then you are asked to specify the code and type.
iii. IP
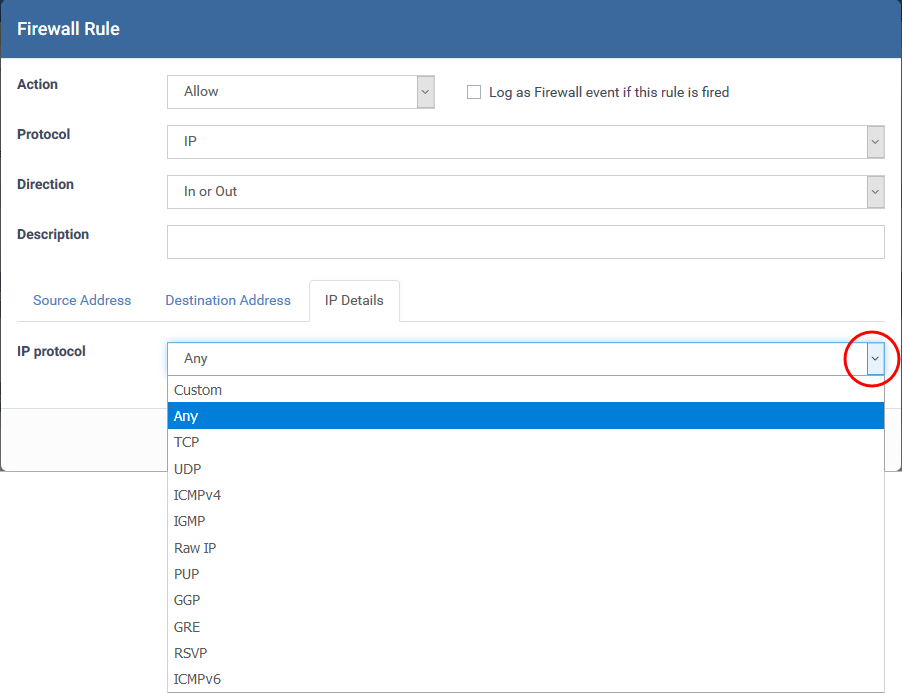
If you select 'IP' as the protocol, then you also have to set the source and destination addresses and IP details. The source and destination addresses can be configured as explained above.
IP Details
-
IP Protocol - Select the type of IP protocol
-
Click OK in the 'Firewall Rule' dialog to add the rule to the ruleset
-
Repeat the process to add more firewall rules.
The rules are added to the list.
-
Click 'Save' in the 'Firewall' pane for your rules to take effect on the endpoints to which the profile is applied.
Further reading:
How to configure general firewall settings in a Windows profile
How to configure internet access rights for applications via Endpoint Manager
How to create a custom firewall rule set in a Windows profile
How to configure network zones in a Windows profile
How to configure port sets in a Windows profile
