How to configure antivirus settings in a Linux profile
Click ‘Configuration Templates’ > ‘Profiles’ > open a Linux profile > Click ‘Add Profile Section’ > ‘Antivirus’
- Background
- Add an AV section to a profile
- Scanner settings
- Scan profiles
- Scheduled scans
- Further reading
- The antivirus section of a profile lets you control how the virus scanner in CCS operates on managed Linux endpoints. There are three main sections:
- Scanner Settings - Configure general options for real-time, manual and scheduled scans. Choose files you want to exclude from scans.
- Scan Profiles - Scan profiles tell CCS which items to scan. You can pick a full or quick scan, or create a custom profile to scan specific areas. Once saved, you can apply a scan profile to any scheduled scan.
- Scheduled Scans - Choose when you want the scan profile to run on managed devices.
- Scanner Settings - Configure general options for real-time, manual and scheduled scans. Choose files you want to exclude from scans.
- It is essential to add an antivirus section to a profile if you want virus scans on your endpoints.
Add an AV section to a profile
- Log into Comodo One / Xcitium
- Click ‘Applications’ > ‘Endpoint Manager’.
- Click 'Configuration Templates' > 'Profiles'
- Open the Linux profile applied to your target devices
- Open the 'Antivirus' tab if it has already been added to the profile
OR
- Click 'Add Profile Section' > 'Antivirus' if it hasn't yet been added:
- Open the 'Antivirus' tab if it has already been added to the profile

The antivirus settings screen opens.
- Click the following links for help to configure each tab:
- Scanner Settings - Configure settings that apply to real-time/manual/scheduled scans, and specify items to be excluded from antivirus scans.
- Scan Profiles - A scan profile tells CCS which files, folders and drives should be included in the scan. You can use a scan profile in a manual/on-demand scan, or add it to a schedule. This area lists all existing profiles and lets you create new profiles.
- Scheduled Scans - Choose when you want the scan profile to run on managed devices.
- Scanner Settings - Configure settings that apply to real-time/manual/scheduled scans, and specify items to be excluded from antivirus scans.
- Click 'Save' to apply the section to your profile.
The scanner settings area has four sections:
- Realtime Scanning - Set preferences for the 'always-on' virus monitor
- Manual Scanning - Set preferences for on-demand (manual) scans
- Scheduled Scanning - Set preferences for scheduled scans
- Exclusions - Specify files/folders which should be skipped by all scan types
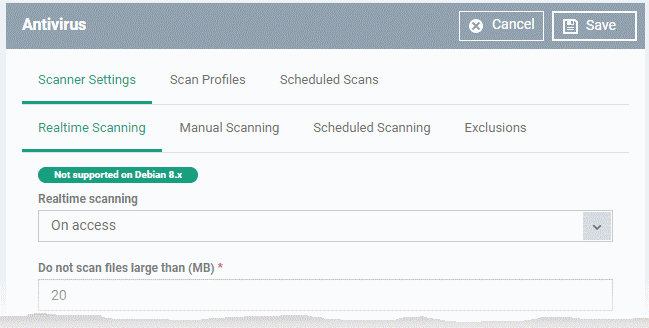
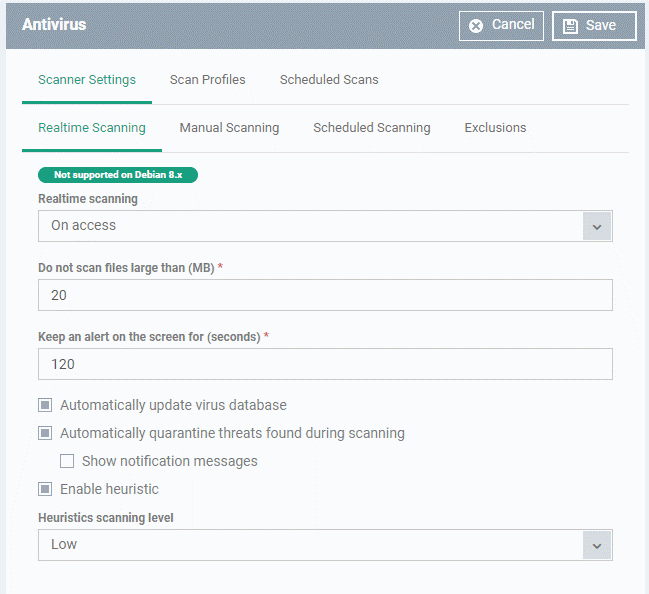
Note: The real-time scanner is not supported on Debian. The settings in this screen do not apply to Debian devices.

|
Real time scanning |
Enable or disable the ‘always-on’ virus monitor on endpoints.
|
|
Do not scan files larger than (MB) |
The maximum file size that the antivirus should attempt to scan. CCS will not scan files larger than the size specified here. (Default = 20 MB) |
|
Keep an alert on the screen for (seconds) |
How long threat notifications should stay on-screen if not dismissed by the end-user. (Default = 120 seconds) |
|
Automatically update virus database |
CCS will download any available updates at system start-up, and subsequently at regular intervals. (Default = Enabled). |
|
Automatically quarantine threats found during scanning |
Any discovered threats are moved to a secure holding area where they can cause no harm. You can review quarantined items and delete, ignore or restore them. (Default = Enabled) |
|
Show notification messages |
Choose whether or not an alert is shown to the end-user when CCS quarantines a threat. (Default = Disabled) |
|
Enable heuristic scanning |
The heuristic scan level determines how likely the scanner is to classify an unknown file as a threat. The scan level determines how likely the scanner is to classify an unknown file as a threat.
(Default = Enabled with 'Low ' option) What is heuristics? The technology identifies code typical of a virus, rather than looking for a signature that matches a signature on the blacklist. This allows the engine to discover brand new viruses, even if they are not in the current virus database. |
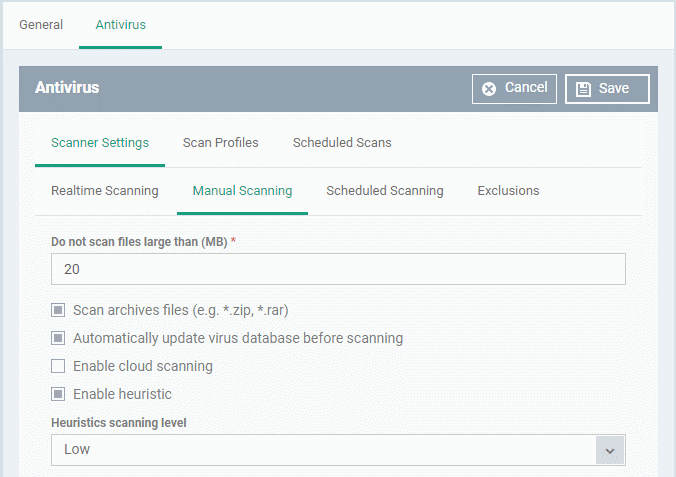
- A manual scan is one you run 'on-demand' on specific files, folder or drives.
- For example, you can launch a manual scan on your devices direct from Endpoint Manager. Go to 'Security Sub-Systems' > 'Antivirus' > 'Device List' > select a target device > Click the ‘Scan’ button.
- See 'How to run virus scans on devices from the security sub-systems menu' for help to do this.
- You can also run manual scans from the CCS installed on the Linux device. Click 'Antivirus' > 'Run a Scan' > select a scan profile > 'Scan'. See this help page if you need help to run on-demand scans on the local device.
- For example, you can launch a manual scan on your devices direct from Endpoint Manager. Go to 'Security Sub-Systems' > 'Antivirus' > 'Device List' > select a target device > Click the ‘Scan’ button.
- The Manual Scanning interface lets you select options for on-demand scans:

|
The maximum file size that the antivirus should attempt to scan. CCS will not scan files larger than the size specified here. (Default = 20 MB) |
|
|
Scan archive files |
CCS scans archive files such as .ZIP and .RAR files. (Default = Enabled). |
|
Automatically update virus database before scanning |
CCS will download any available updates at system start-up, and subsequently at regular intervals. |
|
Enable cloud scanning |
Augments the local scan with a real-time look-up of Comodo's online signature database. This makes virus scans more accurate because the cloud database is the most up-to-date. With cloud scans enabled, CCS can detect new malware even if the local database is old. (Default = Enabled). |
|
Enable heuristic scanning |
The heuristic scan level determines how likely the scanner is to classify an unknown file as a threat.
(Default = Enabled with 'Low ' option) What is heuristics? The technology identifies code typical of a virus, rather than looking for a signature that matches a signature on the blacklist. This allows the engine to discover brand new viruses, even if they are not in the current virus database. |
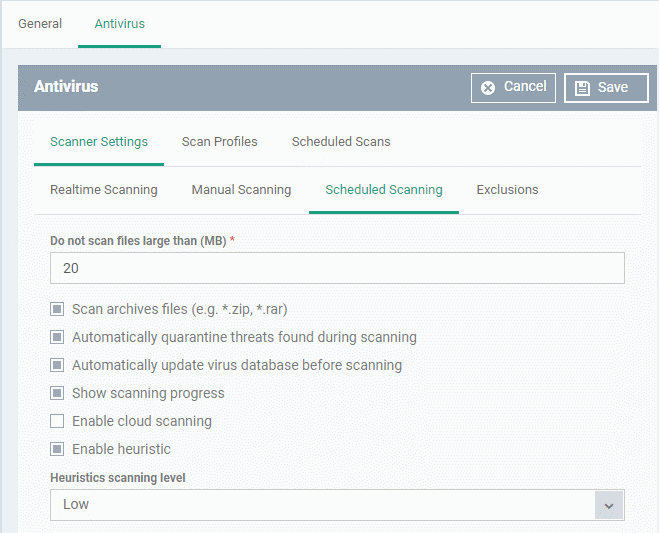
The settings you specify here apply to all scheduled scans that you create.
The preferences for scheduled scans are similar to manual scans as explained above, except:
|
Automatically quarantine threats found during scanning |
Any discovered threats are moved to a secure holding area where they can cause no harm. You can review quarantined items and delete, ignore or restore them. (Default = Enabled) |
|
Show scanning progress |
End-users will see a scan progress bar when the scan is running. (Default = Enabled) |
- The 'Exclusions' tab lets you specify files and folders that should be ignored by the antivirus scanner
- Any item you exclude will be skipped by ALL types of scan - real-time, on-demand and scheduled.

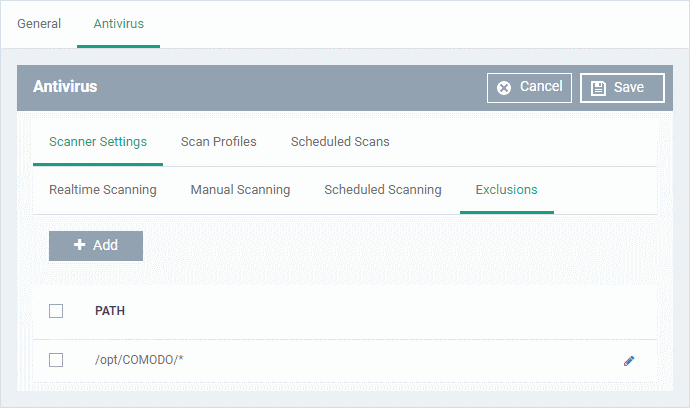
- Click 'Add'
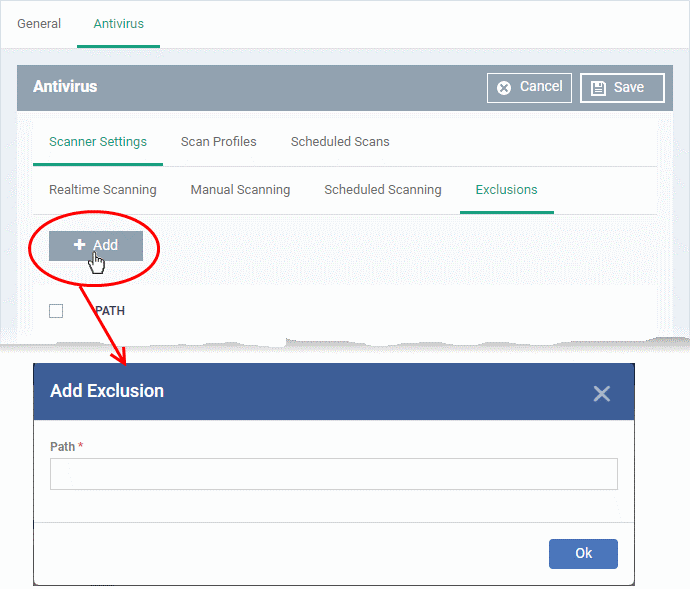

- Enter the full path of the item you want to exclude then click 'OK'.
- Repeat the process to exclude more items.
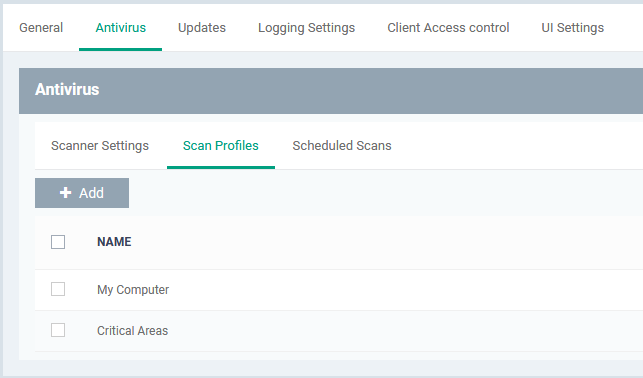
- Scan profiles tell CCS which files, folders or drives to scan on a device
- CCS ships with two default profiles – 'My Computer' and 'Critical Areas'
- You can also create custom profiles which consist of specific items
- Any profiles you create can be added to a scheduled scan

Create a scan profile
- Click 'Add'
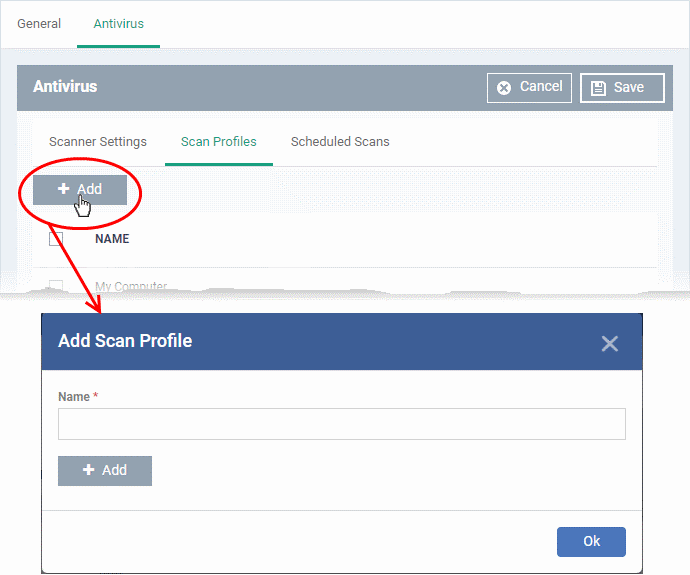

- Enter a label for the scan profile
- Click 'Add' to specify the item you want to scan. This can be a folder, drive, file or area:

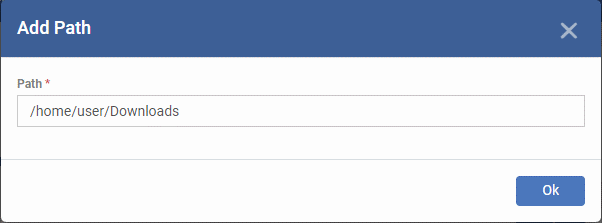
- Enter the path of the item you want to scan then click 'Ok'
- The path is added to the profile as follows:

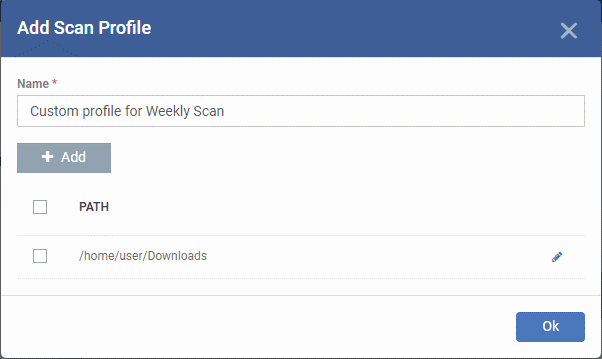
- Repeat the process to add more paths
- Click 'Ok'
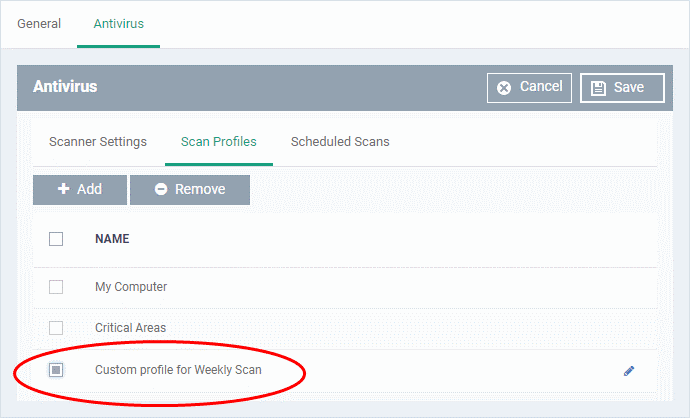
The scan profile will be added to the list and can be selected as part of a scheduled scan.

- The highly customizable scheduler lets you set up recurring scans on managed devices. CCS scans the items in the scan profile at the times you specify in the schedule.
- You can create multiple schedules to take advantage of different scan profiles.

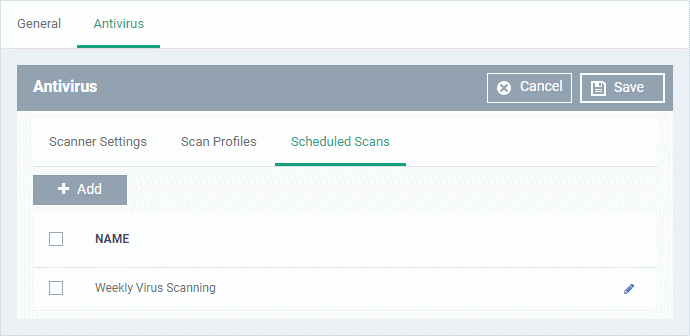
- Click 'Add' to create a new scheduled scan

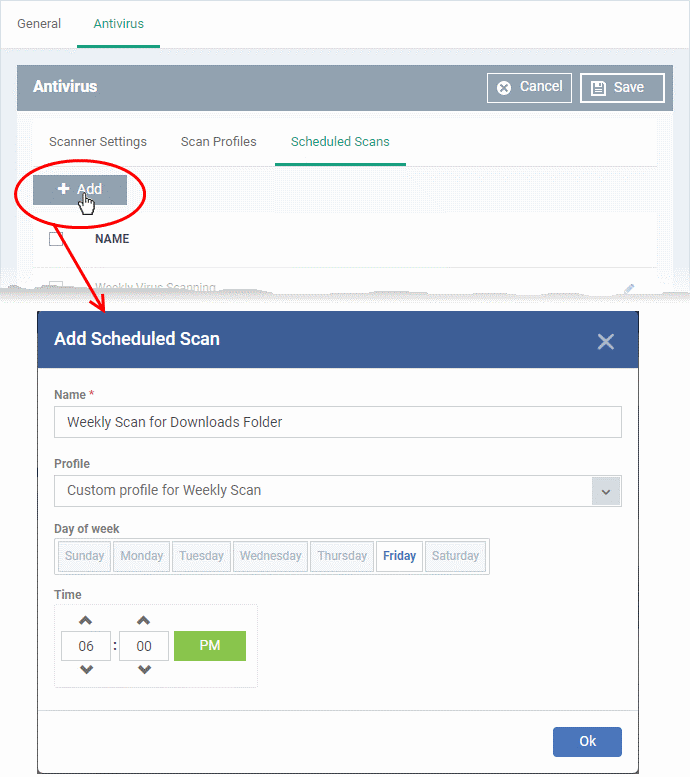
- Name - Label of the schedule. Pick something that describes the frequency and target of the schedule. For example, ‘Daily scan of the apps folder’, or ‘Weekly scan of sales team laptops’.
- Time - The time the scan should start.
- Day of week - Select the days of the week on which the scan should run.
- Profile - Choose the pre-defined or custom scan profile you want to use in this scheduled scan. All profiles listed in the 'Scan Profiles' tab will be available in the drop-down.
- Click 'OK'
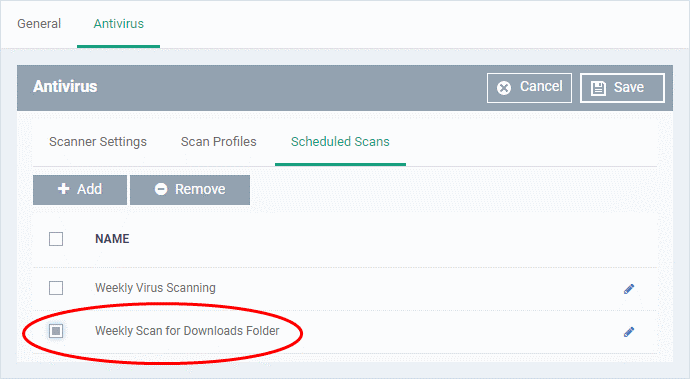

- Repeat the process to add more scan schedules
-
Click 'Save' to apply the schedule to your configuration profile.
How to run virus scans on devices from the security sub-systems menu
How to manage quarantined items in Endpoint Manager
How to configure antivirus settings in a Mac OS profile
How to configure antivirus settings in a Windows Profile


---